Setting up Stalwart on Coolify
Recently, I started self-hosting my services on a VPS. The goal: take back control of my stack, following DHH’s movement to leave the cloud, and try to be as self-reliant as possible.
A friend really hyped me up on Coolify, an easy-to-use open-source PaaS in the vein of Heroku/Netlify/Vercel, and the whole thing runs on Docker. So I figured I’d host one. The setup is dead simple and it turns out Coolify is really great. There’s a packaging system that lets you pick from ready-made services like RocketChat, PenPot, spin up databases in 2 clicks, deploy apps straight from a repo. All the joys of a PaaS while still owning your system.
But all these services need an SMTP server, and looking at what Coolify’s packages offer, they all depend on AWS. None of them provide an SMTP server, and I want to stay self-reliant. So I started digging and came across Stalwart.
Stalwart is an open-source all-in-one mail server supporting SMTP, IMAP, POP3, and JMAP. It’s modern, performant, and well-maintained. Pretty much everything you’d want when you’re looking to self-host your email.
I found an excellent blog post from Aldert Vaandering on how to set it up with Coolify. I followed it but it took me a few more hours than I would’ve liked to get everything working, since the article is a bit dated. So here’s a 2026 update.
Prerequisites
Before getting started, make sure you have:
- A VPS (I’m using Kimsufi, but any provider works)
- Coolify already installed and running on your server
- A domain name with access to its DNS settings
- Basic familiarity with Docker and the command line
- Port 25 open on your server — many cloud providers block it by default to prevent spam. You may need to contact your hosting provider to request it be unblocked (this is a common pain point, even with Kimsufi/OVH)
Creating the Docker Compose service
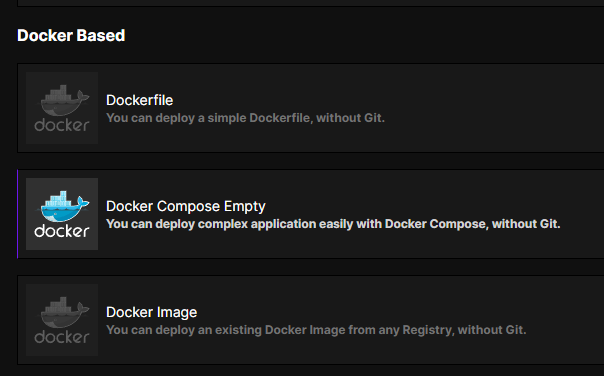
Since there is no pre-packaged service for Stalwart on Coolify, we’ll need to set up everything ourselves.
First off, create a new resource of type Docker Compose Empty:
Then copy the following configuration as the docker compose file:
services:
  stalwart:
        image: 'stalwartlabs/stalwart:latest'
            container_name: stalwart
            networks:
              - coolify
            ports:
              - '25:25'
              - '587:587'
          - '465:465'
              - '143:143'
              - '993:993'
              - '4190:4190'
              - '110:110'
              - '995:995'
            volumes:
              - '/var/lib/stalwart:/opt/stalwart'
              - '/etc/localtime:/etc/localtime:ro'
              - '/data/coolify/certs:/data/certs:ro'
            labels:
              - traefik.enable=true
              - 'traefik.http.routers.mailserver.rule=Host(`mail.YOUR_DOMAIN.COM`) || Host(`autodiscover.YOUR_DOMAIN.COM`) || Host(`autoconfig.YOUR_DOMAIN.COM`) || Host(`mta-sts.YOUR_DOMAIN.COM`) || Host(`mx.YOUR_DOMAIN.COM`) || Host(`smtp.YOUR_DOMAIN.COM`) || Host(`pop.YOUR_DOMAIN.COM`) || Host(`imap.YOUR_DOMAIN.COM`)'
              - traefik.http.routers.mailserver.entrypoints=http
              - traefik.http.routers.mailserver.service=mailserver
              - traefik.http.services.mailserver.loadbalancer.server.port=8080
              - traefik.http.routers.mailserver.tls.certresolver=letsencrypt
              - traefik.http.routers.mailserver.tls=true
              - 'traefik.http.routers.mailserver.tls.domains[0].main=mail.YOUR_DOMAIN.COM'
              - 'traefik.http.routers.mailserver.tls.domains[0].sans=autodiscover.YOUR_DOMAIN.COM,autoconfig.YOUR_DOMAIN.COM,mta-sts.YOUR_DOMAIN.COM,mx.YOUR_DOMAIN.COM,smtp.YOUR_DOMAIN.COM,pop.YOUR_DOMAIN.COM,imap.YOUR_DOMAIN.COM'
              - 'traefik.tcp.routers.smtp.rule=HostSNI(`*`)'
              - traefik.tcp.routers.smtp.entrypoints=smtp
              - traefik.tcp.routers.smtp.service=smtp
              - traefik.tcp.services.smtp.loadbalancer.server.port=25
              - traefik.tcp.services.smtp.loadbalancer.proxyProtocol.version=2
              - 'traefik.tcp.routers.jmap.rule=HostSNI(`*`)'
              - traefik.tcp.routers.jmap.tls.passthrough=true
              - traefik.tcp.routers.jmap.entrypoints=https
              - traefik.tcp.routers.jmap.service=jmap
              - traefik.tcp.services.jmap.loadbalancer.server.port=443
              - traefik.tcp.services.jmap.loadbalancer.proxyProtocol.version=2
              - 'traefik.tcp.routers.smtps.rule=HostSNI(`*`)'
              - traefik.tcp.routers.smtps.tls.passthrough=true
              - traefik.tcp.routers.smtps.entrypoints=smtps
              - traefik.tcp.routers.smtps.service=smtps
              - traefik.tcp.services.smtps.loadbalancer.server.port=465
              - traefik.tcp.services.smtps.loadbalancer.proxyProtocol.version=2
              - 'traefik.tcp.routers.imaps.rule=HostSNI(`*`)'
              - traefik.tcp.routers.imaps.tls.passthrough=true
              - traefik.tcp.routers.imaps.entrypoints=imaps
              - traefik.tcp.routers.imaps.service=imaps
              - traefik.tcp.services.imaps.loadbalancer.server.port=993
              - traefik.tcp.services.imaps.loadbalancer.proxyProtocol.version=2
            tty: true
            stdin_open: true
            restart: always
        volumes:
          data: null
            networks:
  coolify:
    external: true
(Make sure you replace YOUR_DOMAIN with whatever your domain is, of course.)
The main thing here is that Coolify runs all your containers behind Traefik, a reverse proxy. So we want Traefik to handle the generation of the required TLS certificates instead of handing that responsibility to Stalwart, as well as routing all the services Stalwart offers.
This is why we use the official Stalwart Docker image with the standard configuration, with two exceptions:
- We connect the image to the Coolify network so it has access to the internet and stays manageable by Coolify.
- We mount
/data/coolify/certs(where Traefik generates the certificates) to the/data/certs:rodirectory in the Docker container (with read-only permissions).
We are also configuring Traefik to generate a certificate that encompasses all the domains required for Stalwart (smtp, mx, etc.). If you don’t use certain protocols, feel free to add or remove them.
Make sure to enable Connect To Predefined Network and give your Stalwart mail server a domain link, for example mail.yourdomain.com (the 8080 after the domain name is important by the way, don’t remove it. You will still be able to open the Stalwart web UI without adding the port to your URL).
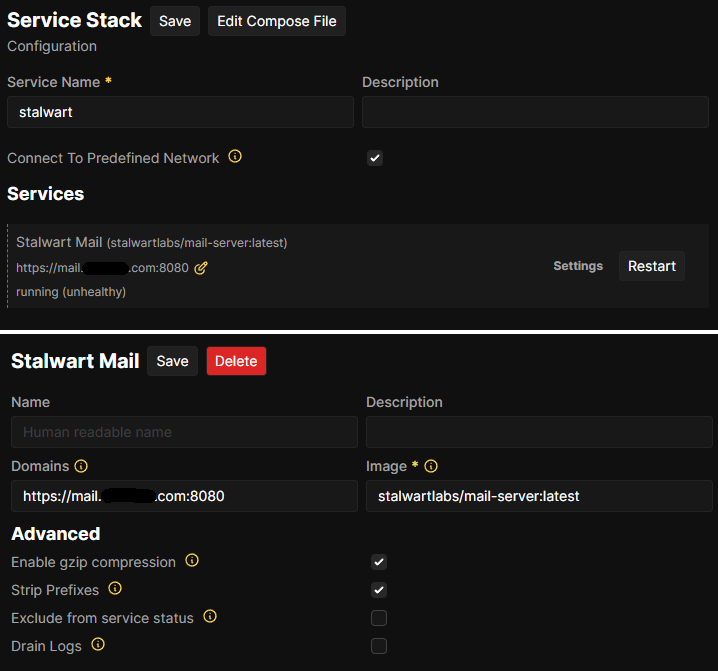
Important! You get the admin user and password for the web interface by deploying and checking the logs. Otherwise you can get fallback credentials from the config (we get to the config later).
Setting up the certificate dumper
Now we need Traefik to share the certificates it creates so we can use them in Stalwart’s configuration. If you’ve set up other services that need certificates, you’ve probably already done this.
We’re going to adjust Traefik settings on your Coolify server by going to Servers -> your server -> Proxy and adding an extra service that extracts and dumps the certs generated in your Traefik acme.json.
The main lines that we care about to get things working with Stalwart are these:
traefik:
  {...}
  command:
    {...}
    # The following line shows where traefik stores the generated certificates:
    - '--certificatesresolvers.letsencrypt.acme.storage=/traefik/acme.json'

  # This service dumps the certs in the above file to /output in the container
  traefik-certs-dumper:
    image: ghcr.io/kereis/traefik-certs-dumper:latest
    container_name: traefik-certs-dumper
    restart: unless-stopped
    depends_on:
      - traefik
    volumes:
      - /etc/localtime:/etc/localtime:ro
      - /data/coolify/proxy:/traefik:ro
      - /data/coolify/certs:/output
      # and this volume binds to the output, so that we can later use the certs in Stalwart
Configuring Stalwart to use the certs
We’re close to the end now. We just need to update the configuration.
If everything went well, your certificates should now be generated and mounted in Stalwart. However, Stalwart won’t know about them yet. To fix this, we need to do some manual configuration (at least I haven’t figured out how to do this from the web UI yet).
Open a terminal on your server (through SSH or via the web interface in Servers -> your server -> Proxy).
Go to /var/lib/stalwart/etc and update config.toml by adding this at the end:
certificate.default.cert = "%{file:/data/certs/mail.YOUR_DOMAIN.com/cert.pem}%"
certificate.default.default = true
certificate.default.private-key = "%{file:/data/certs/mail.YOUR_DOMAIN.com/key.pem}%"
Be careful — if your config.toml uses the table format, you should add it this way instead:
[certificate."default"]
default = true
cert = "%{file:/data/certs/mail.YOUR_DOMAIN.com/cert.pem}%"
private-key = "%{file:/data/certs/mail.YOUR_DOMAIN.com/key.pem}%"
While you’re here, you may as well set your hostname at the top of the file:
lookup.default.hostname = "mail.YOUR_DOMAIN.com"Once that’s done, restart Stalwart in Coolify.
If everything is working, you should find your default certificate in Settings -> Network -> TLS.
Configuring your name server
Open the web interface for Stalwart (mail.YOUR_DOMAIN.com or whatever subdomain you used) and log in with the credentials you got from the logs or your config.toml.
Go to Directory -> Domains and click Create domain. For the domain name, simply use YOUR_DOMAIN.com (whatever is supposed to come after the @ in your email addresses). You don’t need to fill out anything else — just click save.
Then click on the triple dot next to your newly created domain, then on DNS records, and add those records in your DNS settings through your domain name provider’s dashboard.
Be careful: if your Stalwart WebAdmin is on mail.YOUR_DOMAIN.com (just like in this tutorial), you should set the mail CNAME record or you’ll lose access to your WebAdmin.
That’s it — you’ve just configured your Stalwart server and you’re ready to send and receive mail!
If it doesn’t work
You might want to check if you have properly configured your firewall. All the ports specified in the docker-compose.yml file should be open. Remember that port 25 in particular is often blocked by hosting providers — double-check with yours if outbound mail isn’t working.
Have fun with Stalwart!
← Back to blog